Showing posts with label Recipes. Show all posts

Monday, September 09, 2013

Spicy Corn on the Cob

It's corn-on-the-cob season and I have always loved a good ear of corn with butter and salt. But recently I had roasted corn at a festival and the corn came sprinkled with a spice mix that the vendor called "Shucks" mix (i.e.: shucking corn) and Parmesan cheese along with the copious amounts of melted butter. Ever since that festival a few weeks ago, I've been playing with spice combinations and searching the web for recipes. Finally today, I've found the right combo and you're going to love this!

Corn-on-the-Cob Spice Mix
(I used a regular spoon from the silverware drawer, not measuring spoons... so these "measurements" are sort of approximate.)

3 spoons - Lawry's Season Salt
2 spoons - Garlic Herb Seasoning (similar to this variety of Mrs. Dash)
1 spoon - Garlic Powder (not garlic salt!)
1/2 spoon - ground Red Pepper powder (adjust to your own taste, this gives it a kick!)
1 spoon - Paprika


Mix together and put into a shaker bottle. Sprinkle on buttered corn then add a generous sprinkle of Parmesan cheese. Enjoy!

One more tip.... how to cook corn-on-the-cob.  I use to shuck the corn and boil it. But ever since I saw this video on YouTube, I don't use any other method. Just throw the whole cob - husks and all - into the microwave for 4 minutes. Don't attempt to clean up the corn before putting it in. If the hairs are really long, sometimes I'll chop them off with kitchen shears, but I usually don't bother.

When your 4 minutes is up, take it out with a hot pad and cut off the "stem end" and then just shake out the cob from the husk. Easy! Watch the video, this guy is so cute!


Friday, July 12, 2013

Summer Recipes

When the sun is high in the sky and the temperature is rising, I just don't feel like cooking. I want summer food! Usually that's something simple and cool like salad or a wrap sandwich or a big ole pile of fruit. I thought I'd share some of my favorite summertime recipes today.


Chicken Salad -- delicious with rotiserie chicken, grapes and celery. I love this on a bed or mixed salad greens and slices of fresh tomato

Tortilla Pizza -- So many this isn't just for summertime but I love how quick and easy these Tortilla Pizzas are - and once you get going on these, the topping choices are endless! They work great by using the round fajita shells, or you can use the FlatOut Bread for something a bit more sturdy.

Fruit Smoothies -- nothing like a healthy protein smoothie on a hot summer day. The Fuzzy Navel is a favorite. Or my go-to option is just banana & strawberries.

Protein Popsicles -- Yes, we all need a sweet frozen treat. Here's a recipe for Protein Fruit Popsicles. Or how about Frozen Chocolate Covered Bananas? I especially love my Blackberry Yogurt Protein Popsicles.

Salads -- I love this Crunchy Asian Coleslaw and it makes a great dish to pass for picnics. Or you could do some Greek Yogurt Coleslaw for some added protein.

Fruit Jello Bars -- and who doesn't love Jello for a cool summer treat? These are a great hit at picnics too. They're like finger Jello for adults.

For more food ideas you can always check out my Recipe Index for a full list of all the recipes here on my blog.

Enjoy!
Pam


Thursday, April 25, 2013

Freezing Strawberries

I love strawberry season! It's a bit early for Michigan Strawberry season (that's in June-ish), but it must be the season somewhere because my local grocery story recently had a huge sale. Whenever I find berries on sale -- strawberries, blackberries, raspberries -- I buy up a whole bunch and freeze them.

Frozen fruit is great for making smoothies by replacing ice cubes with fruit for a rich flavor. You can also freeze banana chunks and yogurt cubes or even leftover fruit salad, pureed and transformed into smoothie starters.

So I bought about 15 quarts of strawberries ($15 investment). Just hull the strawberries, cut them in half and spread out on a baking sheet. Then freeze for a few hours until the fruit is solid and then transfer to gallon size zipper bags.

Once finished I ended up with 3.5 gallon bags of strawberries. When I checked the price of this amount at the store, it would have cost about $35 for that much!


Thursday, October 11, 2012

Chicken Burrito Casserole


If you like my Southwest Chicken, you're going to love this recipe, too. A couple weeks ago I was at a health fair and one of the exhibitors had a chef preparing different types of healthy foods. One of the dishes he made was this delicious Chicken Burrito Casserole -- and I'm so glad he was handing out recipes! I've been eating this dish all week for lunches and thought I'd share it with you.

Of course, I adjusted the chef's recipe a bit (did you have any doubt?). The recipe calls for the mixture to be thicker than I made it (I added extra water) and served in a soft burrito shell. However, I didn't want the extra carbs and also wanted to eat "just the insides" of the burrito. So here's my version:

Chicken Burrito Casserole

1 store-bought rotisserie chicken - shredded or chopped
1 tablespoon garlic - minced
1 bunch green onions - sliced
1 packet taco seasoning
1 cup black beans
1 green pepper
2 cans Rotel - diced tomatoes with green chilies
water - optional

In a large skillet heat the chicken, garlic, onions in oil. Add taco seasoning and mix well to coat all chicken pieces. Add remaining ingredients. If you prefer a casserole type mixture, add about 1 to 2 cups water until you get the consistency you like. If you want a thick mixture for burritos, leave the water out.

Serving:

I think it's great just on it's own with a few tortilla chips on the side. Or you could add shredded cheese, sour cream and fresh cilantro to garnish.


Friday, August 31, 2012

Caribbean Jerk Grilled Veggies

Perfect for a holiday weekend cookout, this recipe for Caribbean Jerk Grilled Veggies is super easy and super delicious!

The photo here was taken on my recent camping vacation and served with a side of grilled chicken breast using the same Caribbean jerk sauce.

Just spread out a large sheet of aluminum foil and throw on an assortment of vegetables. I used new potatoes, mini carrots and mushrooms. Sprinkle with salt (or my favorite, Lawry's Season Salt) and add Caribbean Jerk marinade.

Wrap the foil around the veggies into a pouch and grill for about 20-25 minutes or until the veggies are tender.

Of course, this method of grilling vegetables can be used in an endless array of recipes. Just mix up the veggie combo and choose various flavors of marinade.

Maybe pair baby zucchini and summer squash with lemon pepper marinade and serve with grilled fish. Or a more hearty mix of mushrooms and onions in a red wine and serve alongside steak. The possibilities are endless and exciting!

Enjoy!
~Pam

Monday, December 05, 2011

Peanut Butter Chocolate Fudge Pie

At tonight's support group meeting my dear friend Ruthann brought her now-famous Peanut Butter Chocolate Fudge Pie. Even though she originally got the recipe from me and this blog, I'm officially calling it Ruthann's. Why? Because she makes it for lots of different WLS potluck gatherings and people even ask her to make it (yes Mike, I'm looking at you!).

But I realized tonight that the recipe isn't actually featured in an individual blog post here on this site. The recipe is buried on page 143 of the "Protein Book" that's been downloadable here for the past few years. Yep - that's the book that started it all back in 2009 and will soon be transformed into my newly published book (yes, it's still coming!). So without further ado, I'm passing along this delicious recipe for all to try.

Peanut Butter Chocolate Fudge Pie

Crust Ingredients:
2 eggs
2 cups Splenda
2 cups peanut butter

Other Ingredients:
1 box sugar-free, fat-free Chocolate Fudge Pudding mix (prepare according to directions on box)
Chocolate Protein Powder - optional
Sugar Free Cool Whip


Make the crust first and press the mixture into a baking dish (9x13 pan works great here) and bake for 8-10 minutes (watching it closely so it doesn’t burn) at 350 degrees. Let this cool.

Mix up your pudding. I typically add a scoop or two of chocolate protein powder to boost the protein content overall, but this is optional. Fill cooled crust shell with the pudding mixture. You can also add some additional peanut butter to the pudding mixture if you would like it to be even richer. Refrigerate. Top with SF Cool Whip before serving. Enjoy!

COOKIES TOO!  For those who aren't familiar with no-flour peanut butter cookies, check out the ingredient list for the crust. Cut that recipe in half, add a tablespoon of vanilla and Bam! you have peanut butter cookies! Just roll into balls, press with fork and bake for 8 minutes or until just set.

Thursday, November 10, 2011

Hot Hot Hot Protein Drinks

Here in Michigan we just got a forecast of snow flurries for tomorrow. So far I'm still in denial and don't plan to let those bad weathermen get me down. I'd be perfectly happy if we could rewind and go back to April and start spring over again. But alas, winter is just around the corner. Which means HOT drinks are on the menu. And I've got a bunch of options for those looking for something a little hot for their protein drink.

Protein Hot Chai Tea
This remains one of my favorites of all time. I still drink it regularly... yes, 3 years later and I still love it. What's great is you can drink it all different ways, not just hot. It's great served over ice or made into protein ice cream. Yum!

Protein Hot Cocoa
When you need a chocolate fix, this is perfect! I love the extra chocolatey version of using the packet of Swiss Miss Hot Cocoa in addition to the scoop of chocolate protein powder. This is also great if you add a splash of caramel SF syrup and a dash of salt for a salted caramel hot cocoa. Mmm...

Vanilla Caramel Protein Hot Tea
My friend Kristy didn't like the chai tea recipe above so much. So she invented an alternative. Then I converted her concoction to a big batch recipe. This is my second favorite hot protein drink, I think. It's so smooth and silky with a yummy aroma that just makes you feel all cozy. You must try this!

Caramel Apple Protein Cider
If you're like me and want to hold on to fall for as long as possible, then this drink is for you! Nothing says autumn like apple cider and this version is so delicious. I love the hint of cinnamon and that smooth caramel tone in the background. Delicious!

Protein Coffee
I saved the best for last - coffee! If you're a regular reader of this blog you know that I have a love / hate relationship with coffee (more love than hate). I've got a few variations of coffee recipes here. The Keurig Protein Coffee version. The regular old coffee maker type of protein coffee. And don't forget the iced protein coffee too. And then there's the non-protein version that is the homemade vanilla latte that I love so much.  BUT, don't forget that too much coffee is a bad thing for calcium and iron absorption. So I have to limit my intake of caffeine and sometimes have to switch to decaf if I want a second or third coffee helping later in the day.

Enjoy some of my favorite hot protein drinks. And stay warm!

~Pam

Monday, October 31, 2011

Skillet Apple Crisp

After making the sugar free Healthy Homemade Granola I found myself with lots and lots of granola to eat up. Which is great! But after so much yogurt, I started looking for some variety in how to use the granola.

After chatting with a co-worker I decided to try making some apple crisp. But rather than make a whole big batch, I wanted to try just one apple's worth of apple crisp. So this is the recipe I concocted.

DSC_0472


Ingredients:
  • 1 medium apple - peeled, cored & sliced
  • 1 pat butter
  • 1 to 2 teaspoons Splenda Brown Sugar
  • 1 teaspoon vanilla
  • dash of salt
  • Healthy Homemade Granola (approximately 1/4 cup, or to your taste)
Directions:

In medium skillet, melt butter and blend in Splenda Brown Sugar, vanilla and salt. Add sliced apples and allow to simmer until apples are heated through, but still remains slightly crisp (only about 3 minutes). Add granola -- enough to cover the top of the apples, about 1/4 cup or however much you prefer. 

Because this is such a carby treat, be sure you're balancing this with plenty of protein if you're on the WLS plan. And remember that Splenda Brown Sugar contains real sugar - it is half real sugar and half Splenda - so if you have a sugar intolerance, use this with caution.

Be warned... this is DELICIOUS and addicting!

Enjoy!
~Pam

Friday, October 21, 2011

Healthy Homemade Granola

I love granola but I don't like all the added sugar that comes with store-bought varieties. I've been wanting to make my own granola for a while now, but haven't taken the time to research how to do it or actually spend enough time in the kitchen to do it. Until now!

I spent some time online looking at granola recipes from other bloggers and also chefs on the Food Network website. I came across about six different recipes that I liked and decided to combine some of the elements of each and figure out a way to make the whole thing sugar-free.

EDW_0026
Peach Carbmaster Yogurt, Mandarin Oranges & Healthy Homemade Granola

Dry Ingredients:

  • 2 c. Kashi Go Lean high-protein cereal
  • 4 c. old fashioned rolled oats (not quick oats)
  • 1/2 c. unsweetened coconut (this is hard to find in stores, I buy mine on Amazon)
  • 1/4 c. sunflower seeds
  • 1/2 c. sliced almonds (whole almonds or slivered almonds would work too)

Wet Ingredients:

Finishing Ingredients:
  • 1 c. dried cranberries, raisins, cherries or other dried fruit (I use Craisins)

Directions:
Mix all dry ingredients in large bowl and set aside. Mix all wet ingredients until Splenda Brown Sugar is fully dissolved. Pour the wet ingredients over the oat mixture and mix completely with your hands until everything is well coated and all the liquid is absorbed. Arrange the mixture onto two large baking pans and place in 300-degree oven. Bake for a total of 15 to 30 minutes, depending on how dark you like your granola. VERY IMPORTANT: Stir the granola every 7 minutes to make sure it is being baked evenly. Remove from oven and let cool completely. Toss in cranberries or other dried fruit. Store in air-tight container. 

* Note: Splenda Brown Sugar is not sugar-free. It is half Splenda and half real brown sugar. Please use caution when using this ingredient if you have a sugar intolerance. An alternative I've heard about from others is called Ideal Brown Sweetener that does not include sugar -- have you tried it before?


I am enjoying my granola in my yogurt lately. The picture above is Peach Carbmaster Yogurt with a snack cup of mandarin oranges and a generous helping of my Healthy Homemade Granola mixed in. It's delicious!

EDW_0029

Saturday, March 26, 2011

Spicy Turkey & White Bean Souperole

One of the things I love doing as I learn about graphic design and work toward my degree is to leaf through magazines and look at ads, article layout and general graphic designery type stuff. I pull out pages that catch my interest and add them to my "inspiration" notebooks.

Of course, as I'm looking through magazines I find stuff I want to refer back to that has nothing to do with graphic design stuff.... like recipes! This happens to be one of them.  This recipe started out as "white bean turkey chili" -- but once I started making it, and changing it, it turned into something different.

DSC_1018


This dish falls somewhere between a soup and a casserole. It's not quite brothy enough to be a soup, but it's too brothy to be a casserole. So I've created a new word for it: Souperole!

I made a large pot of this so I could freeze leftovers for quick meals. This recipe would also be enough to feed the whole family and still have some leftovers. Here's the recipe:

Spicy Turkey & White Bean Souperole


  • 1 pound ground turkey
  • 1 pound ground turkey sausage (spicy!)
  • 1 can great northern white beans (drained/rinsed)
  • 1 can garbanzo beans (drained/rinsed)
  • 1 large onion 
  • 2 tablespoons minced garlic (I use the stuff in the jar)
  • 5 stalks celery
  • 1 8oz package sliced baby bella mushrooms (chopped to bite size pieces)
  • 1 cup (or more) shelled edamame
  • 6 oz sliced jalapeño peppers (with the juice) - I used this
  • 1 32oz box chicken stock
  • 4 oz cream cheese (half a block)
  • 2 tablespoons dried oregano
  • 2 tablespoons cumin
  • salt and pepper to taste


In an extra large skillet (I have one like this) brown the ground turkey. Add the onion, garlic, celery and spices and let cook until the celery is tender. Add the remainder of the ingredients except the cream cheese. Let this simmer until everything is all combined and happy together (about 10 minutes). Add the cream cheese and let it melt into the mixture.

You could easily take this recipe all the way to "Soup" by adding a second box of chicken stock. Or you could drop this recipe back to a true casserole by eliminating the chicken stock and adding a cream soup to it then baking it in the oven for 20-30 minutes. I personally enjoyed the half-soup-half-casserole personality of this dish.

Enjoy!
~Pam

Wednesday, March 09, 2011

Beef & Barley Veggie Soup

The first time I ever tried barley years ago I had no idea what to do with it. So I just made the recipe on the side of the box for Beef & Barley soup. It was very good and that's all I've ever done with barley since that first time. It has been years since I've tried that recipe. But then a lady at work mentioned the other day that she'd made that same recipe and was going to have some of that soup for lunch. So of course I wanted some too --- and I've got plenty! It's my lunches all this week.

DSC_0402

Beef and Barley Veggie Soup

  • 1 cup dry pearl barley
  • 1 pound lean ground beef
  • 1 large onion - chopped
  • 2 large carrots - chopped
  • 2 stalks celery  - chopped
  • 1 can petite diced tomatoes
  • 1 cup shelled edamame
  • 2 small red skinned potatoes - diced
  • 1 large bunch fresh spinach - rough chopped
  • 2 quarts beef broth
  • Italian seasoning
  • salt & pepper


Brown the ground beef, drain and add to stock pot. Sweat the onions in the beef drippings and add to pot. Add barley, carrots, celery, potatoes, tomatoes and edamame to the pot along with the beef broth and seasoning. Allow simmer until barley and veggies are tender. Add the spinach and allow it to wilt. 

Serve with a side salad or a few whole grain crackers. 

Enjoy!
~Pam

Monday, March 07, 2011

Banana Oat Muffins

For the past few weeks I've been experimenting with a new breakfast routine. Actually, not just breakfast -- but a whole new morning routine. So far I've been liking it when I can actually pull it off. I've been getting out of bed 30 minutes early lately. While the coffee is brewing I'll do several yoga stretches and spend about 15 minutes getting in a mini-workout. Then I enjoy a cup of coffee in the silence of the morning before I get ready for work.

Then on the drive to work I'll eat one of the Banana Oat Muffins. They are delicious, low in calories and packed full of nutrients and fiber. A great start to my morning!

DSC_0293


Ingredients
2 1/4 cup oat bran (see below for instructions)
1 T baking powder
1/4 cup Splenda
1 T cinnamon
2 large overripe bananas
1 1/4 cup milk
1 egg

Optional add-ins
2 T nuts (I use sliced almonds)
2 T dried fruit or raisins (I use cherry cranberries)
1/4c coconut

I can't seem to find Oat Bran in any local store so in a pinch I decided to try making my own. In a food processor put several cups of old fashioned oats (not quick oats) and blend until the oats become a flour consistency. I had a one pound box of oats and just whizzed up the whole container and stored the leftovers for the next time I made muffins.

DSC_0148
In a food processor puree the bananas. Add the egg and whirl again. Mix all dry ingredients in bowl, add banana/egg mixture and milk. Mix with spoon until well blended. Spray a 12-slot muffin tin with non-stick spray and preheat oven to 450-degrees (yes, I know that's hot, but trust me!). The batter will make exactly 12 muffins - fill the cups all the way to the top using a 1/2 cup measuring cup.

Bake at 450-degrees for 15 minutes. Let them cool for 15-20 minutes in the pan before attempting to remove them. They will shrink slightly as they cool and be easier to take out of the pan. Cool completely on a wire rack.

To hide these from your family and save them for your own breakfasts, this is what I do. Wrap each muffin individually in aluminum foil and place in the freezer. Then each morning remove a muffin and put in the microwave for 40 seconds. Re-wrap and pack it in the lunch bag for breakfast on the commute to work.

Enjoy!
Pam

Monday, February 28, 2011

Homemade Vanilla Latte

DSC_0203
I have a new passion for my weekend mornings lately. Homemade vanilla lattes! You know I have a passion for something when I start taking pictures of it, right?  

I recently discovered whole bean coffee in a delicious french vanilla flavor - Meijer Gold Whole Bean. I can't find it online for you because they sell it at Meijer (a local grocery store)... but it's similar to Eight O'Clock Coffee.

So here's my recipe - which really more of a step-by-step process to make a 12-ounce latte:
  1. Grind your beans and brew a pot of vanilla coffee
  2. Heat 6 ounces skim milk on the stove and allow the milk to scald - how-to video or instructions for doing it in the microwave 
  3. Add scalded milk to mug 
  4. Add 1-2 tablespoons Sugar Free Vanilla Syrup (I use Torani)
  5. Froth milk with a cool frothing tool - areolatte - or a whisk would work too
  6. Pour coffee into mug, stir slightly (being careful not to disturb the precious foam)
  7. Enjoy!
2011-02-26


Sunday, February 27, 2011

Spaghetti and Meat Sauce

DSC_0201
One of the things I've missed since having WLS is spaghetti with my homemade tomato and meat sauce. But after discovering Dreamfields Pasta recently (see the post here)... I've decided to give spaghetti a try.

The only store locally I can find Dreamfields is Meijer which is only located in Michigan and Ohio I think. I'm sure it's out there more places but I haven't found it. Thankfully Amazon comes to the rescue and you can get it online for the same price I paid in the store ($2.59/box)

My amazing friend Mikey taught me how to make his version of spaghetti sauce several years ago and I haven't bought jarred sauce since. I've tweaked it a bit over the years and think it's pretty awesome. I haven't made it very often since my surgery but it's thick enough that you could easily eat this alone - I'll post some alternative recipes below if you don't want to try the pasta. The sauce is delicious - definitely try it!

Spaghetti Sauce

  • 1 pound ground beef
  • 1 large onion
  • 8 ounces sliced mushrooms
  • Lawry's Seasoned Salt
  • 6-ounce can tomato paste
  • 28-ounce diced tomatoes OR crushed tomatoes
  • 1 tablespoon dry Italian Seasoning
  • 2-3 cups water


In a large skillet brown the ground beef, onion and mushroom - season with Lawry's Seasoned Salt.

DSC_0192


Add the tomato paste and crushed (or diced) tomatoes along with a capful of Italian Seasoning. Add about  2 cups of water - or however much it takes to get the consistency you like for sauce. Cover and let simmer for at least 20 minutes.

DSC_0193


In the meantime, cook the pasta according to the package directions. Time the pasta, it will overcook before you realize it!

DSC_0195


Serve the Spaghetti Sauce over the freshly drained noodles. Sprinkle with Parmesan Cheese if you have it (I was all out).


DSC_0201


Alternative WLS-friendly Spaghetti Sauce Ideas:


  • In small individual size baking dish (I have these) add about 1/2 cup to 3/4 cup of the sauce and top generously with mozzarella cheese. Bake at 450 until the cheese is brown and bubbly
  • Instead of pasta noodles, slice rounds from baby zucchini and summer squash that is steamed or baked. Serve sauce over the squash as if it were pasta.
  • The sauce would be a great base for Nikki's no-noodle lasagna

Sunday, February 06, 2011

Creamy Wild Rice, Mushroom & Chicken Soup

On a whim I bought a bag of soup mix when I was out shopping today. It was Shore Lunch Creamy Wild Rice soup mix. (It also comes in Tortilla Soup, Chili, Cheddar Broccoli, Creamy Potato and Chicken Noodle -- I also bought a package of Tortilla Soup to try out.)

Looking at the label I knew that making the soup as directed would be way too carby for it to be WLS-friendly, so I needed to add some protein somehow. I had also recently watched a cooking show (probably on the Food Network) where the chef made a cream of mushroom soup from scratch and used a myriad of different types of mushrooms. So I decided to start experimenting.

Thankfully... the results are fabulous! This is a hearty, rustic soup with an underlying woodsy flavor. The wild rice and cream mixture make it very filling on a small serving. It's definitely comforting on a cold winter day!

Creamy Wild Rice, Mushroom & Chicken Soup


  • 1 package Shore Lunch Creamy Wild Rice soup mix
  • 1 rotisserie chicken (yields about 1 pound meat)
  • 4 cups mixed mushrooms*
  • 1 32-ounce can chicken broth
  • 2 cups water
  • 2 cups low-fat half-n-half


In large slow cooker add chicken broth and water. Whisk in soup mix. Pick chicken from bones and pull or cut into bite-size pieces. Roughly chop mushrooms. Add chicken and mushrooms to slow cooker. Allow to cook 2-3 hours on high or 4-5 hours on low. 30 minutes before the end of cooking, add half-n-half and allow to heat through.

*I don't know what kinds of mushrooms I used exactly because I don't know one from another. I know I used baby bella's (which is what I always buy for my everyday mushroom) and I know I used some enoki mushrooms (because they were labeled as such) and then I grabbed a couple packages of what they called "chef blend" -- which included several different varieties. Be adventurous and try something new!

Try this! It's delicious!

Pam

Sunday, January 23, 2011

Taco Skillet

The other day I was sitting in the parking lot of Walmart, knowing I had to go inside and buy some groceries. But I also didn't want to go in without a plan since I'm trying hard to use up stuff from the pantry and freezer. I needed to cook a pot of something that would work for lunches for the rest of the week, but I didn't have any brilliant ideas for what to cook. What to do?

AhHa! I then remembered I have a couple files on my phone (don't you just love smartphones?) and one of those files was a big long list of my favorite "Nikki-Recipes." So I opened the file and started scrolling through until I came to her Taco Casserole. Ooo... great idea!

DSC_9882


I used most of the same ingredients with a few tweaks, but the prep is completely different and the way she serves it is different that what I'm doing with mine. So I'll share with you my version of:


Nik's Taco Casserole becomes Pam's Taco Skillet Recipe


Ingredients
1 pound lean ground beef
1 pound ground turkey
1 medium onion
1 small zucchini
1 small summer squash
1 bunch fresh cilantro
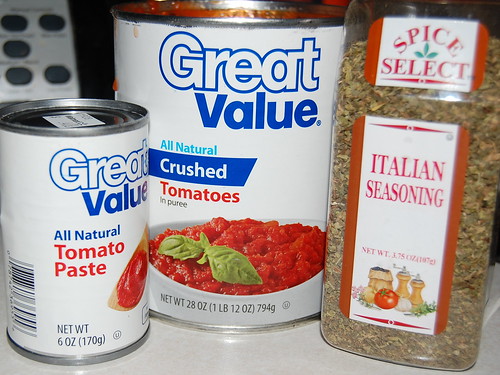
2 cans Rotel (diced tomatoes with chilies)
1 can refried beans
1 cup black beans (I used fresh cooked from dried beans but canned would work too)
1 packet taco seasoning (I actually have a big 24oz jar of taco seasoning that'll last me forever)
Up to 1 cup water (as needed)

For Serving
Salsa & Sour Cream
Iceburg lettuce
Mexican blend shredded cheese
Whole grain tortilla shell

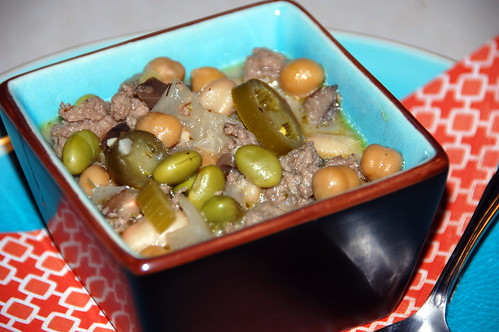
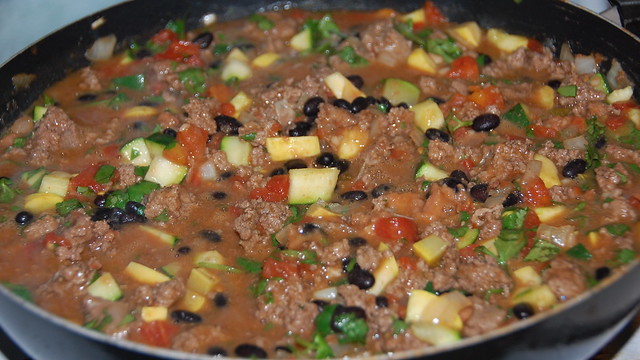
Nik does her Taco Casserole as a true casserole. I made mine 100% on the stovetop and used it as a filling for a taco ... or as a topping for a taco salad. I also wanted to make a big batch so I'd have plenty to freeze for later meals (because I don't have any individual meals left in the freezer, I've eaten them all up!)

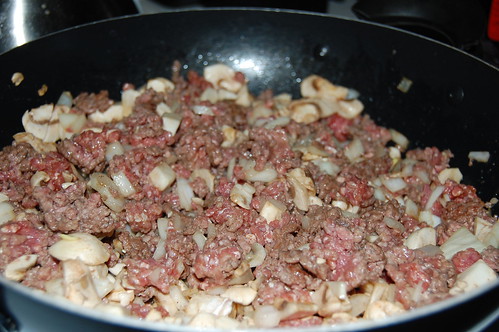
In a very large skillet brown the ground beef and turkey together. In the meantime, chop the onion, zucchini and squash into small pieces (I leave the skin on the squashes). Once meat is browned, drain off the fat and rinse under water (this removes excess fat drippings). Add the taco seasoning and about 1/2 cup water and let this cook for a couple minutes. Add the squashes, onion, diced tomatoes, black beans and refried beans to the skillet. Add additional water if you think it needs it. I let it cook for about 15 minutes as some of the liquid evaporates and gets all thick and delicious. Add the chopped cilantro at the very end just before serving.

I've served this two different ways and love both. For those who know me, I'm about to shock your pants off. Because..... Yes, I'm actually recommending iceburg lettuce here. Gasp! I'm such a lettuce snob that I never buy iceburg. Ever. I'm a mixed baby greens type of gal when it comes to salads. But this concoction just seemed to call for shredded iceburg and it really does work well. Also, I'm recommending salsa and sour cream, but you know my rule with salsa... it's not allowed in the house. So I'm going without. Diced fresh tomatoes work great instead.

DSC_9885

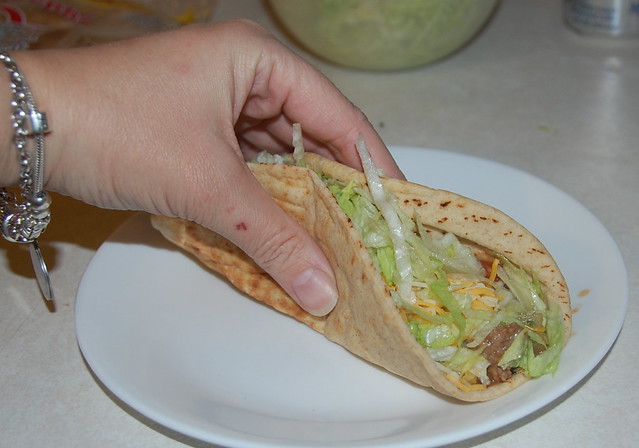
Serving Option 1 -- as a taco. Using a whole wheat, fajita-size tortilla shell, add the meat/bean mixture to the shell and top with shredded iceburg lettuce and cheese. Add salsa and sour cream if you like.

DSC_9890

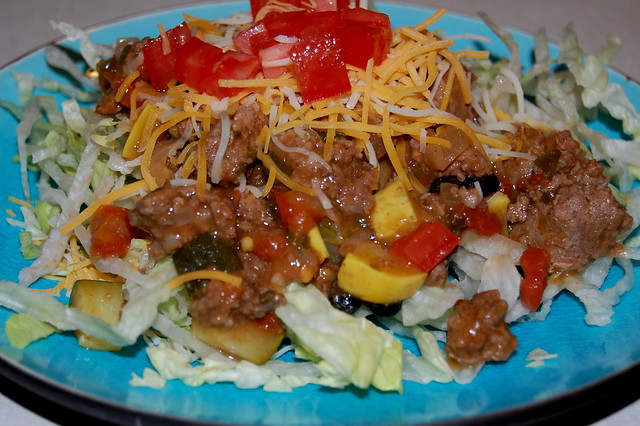
Serving Option 2 -- as a salad. Using a bed of shredded iceburg lettuce, add the meat/bean mixture to the top of the lettuce bed and sprinkle with cheese. This is how I've been having it at work and it's super easy to transport - lettuce in the bowl I'll eat from with a baggie of cheese tucked inside and the Taco Casserole mix in it's own bowl for heating up, then just assemble and enjoy.

I was able to freeze several portions of the Taco Skillet mixture to use on those days when I don't feel like cooking. If you don't want such a large portion you can obviously cut the recipe in half and it would work just fine. This would be a great meal to serve for a large family gathering or informal dinner party. It'd also be ideal for the centerpiece of a Mexican Taco Bar type buffet dinner.

Thanks Nik for a great recipe! I think this will become one of my new favorites.

~Pam

Tuesday, January 11, 2011

One Pot Dinner

After my Dreamfields Pasta experiment and deeming this brand of pasta WLS-friendly and Reactive-Hypoglycemia-safe, I'm excited to share my first pasta recipe that I don't need to add a disclaimer about moderation or excess carbs or "white stuff."

One Pot Dinner


I bought a new cookbook at one of those bargain book stores where they have millions of books piled up on tables everywhere. Make Life Easier - Easy Slow Cooker Recipes. It's a tiny little book that's jammed with so many delicious sounding recipes! All recipes are for the slow cooker, but can easily be adapted to stovetop cooking (like I did with this recipe). This One Pot Meal (page 33) was one of the first that caught my eye. I made a few adjustments for my own tastes and of course, used Dreamfields elbow macaroni instead of traditional pasta.

It turned out pretty delicious and I highly recommend this one for the whole family. The original recipe calls for a sprinkling of cheddar cheese on top of each serving, but I skipped that part since I don't like cheese to muddle up my stuff (gasp! cheese lovers are in shock right now!)


One Pot Dinner Recipe

1.5 pounds lean ground beef
1 teaspoon Lawry's seasoned salt
1 32-ounce carton beef broth
2 15-ounce cans diced tomatoes
1.5 cup great northern white beans (from my freezer stash)
1 large onion
1 pound carrots - sliced
1 cup Dreamfields elbow macaroni, cooked & drained

In a large stock pot, brown the ground beef with seasoned salt and onion. Drain excess fat and rinse with water (this is a trick I learned from Wendy's - that's how they prepare the beef for their chili, rinsed in water after browning). Return beef to pot and add beef broth and carrot slices. Allow this to cook for about 10 minutes until carrots begin to cook and get softer. In another pot, cook the pasta according to the directions on the box, except undercook the pasta by about 2 minutes (cooking will finish in the dinner pot). Add the diced tomatoes and beans along with pasta. Stir and let simmer for 10-15 minutes until everything is blended, cooked soft and ready for the tummy.

I served mine with fresh cracked pepper. But you can add the original recommendation of shredded cheddar cheese if you prefer.


One Pot Dinner

Enjoy!
~Pam

Wednesday, January 05, 2011

Winter Fruit Salad (and Ice Cream)

For Christmas dinner I was asked to bring some type of fruit salad, so I went on a hunt for a recipe. The problem with making fruit salad in December is that fruit is expensive!! Not much in season in the dead of winter in Michigan. I found a couple good recipes to jump from, but my final salad was based mostly on what I found in the produce section of the grocery store. The final concoction was absolutely delicious!

DSC_9568


Winter Fruit Salad

1 red apple
1 green apple
1 pear
black grapes
1 mango
2 oranges (or clementines)
1 container pomagranate seeds (or about 2 whole fruits seeded)
3 kiwi
1 jar peach pie filling (like sugar-free version or this low-sugar version)

Cut up all fruit into bite-size pieces and mix in large bowl. Be sure to add the oranges to the bowl just before or just after the apples/pear and mix them together well. The acid in the oranges will help the apples to not brown. Or you could toss the apples in a bit of lemon juice if you prefer. Add the pie filling and mix well until all pieces of fruit are covered.

DSC_9578

Leftovers?

I had some leftover fruit salad that I took home and enjoyed as a side for a couple meals. Then I thought I'd try making it into some protein ice cream. Here's how I did it.

Winter Fruit Protein Ice Cream

1 scoop vanilla protein powder
1/2 cup Winter Fruit Salad
1 container Carbmaster Yogurt (I used peach)
1 lemonade drink stick (I used Crystal Light)
1-2 tablespoons Splenda (depending on how sweet you like it)
Lots of ice (about 2-3 cups)

Place all ingredients in the Ninja Blender and pulse until ice and fruit are well blended. Then let the motor run for an additional minute to get everything frothy and happy. Serve in a bowl with a spoon.

Enjoy!
~Pam

Related Posts

Related Posts with Thumbnails